
Gboard, commonly known as Google Keyboard, is a favorite among Android users due to its user-friendly interface and extensive feature set.
However, if you’re concerned about privacy or want to clear your typing history for a fresh start, you must know why to delete your Google Keyboard history.
We’ll guide you through the procedures in this post to ensure your text input data is completely erased.
Why Delete Google Keyboard History?
Before we dive into the deletion process, let’s briefly discuss why you might want to clear your Google Keyboard history:
- Privacy Concerns: Your keyboard history records the words and phrases you’ve typed, potentially including sensitive information like passwords or personal messages. Deleting this history can protect your privacy.
- Space Optimization: Over time, your keyboard history can take up considerable storage space on your device. Clearing it can free up space for other essential files and apps.
- Improved Typing Experience: Resetting your keyboard history can help Gboard better predict your typing and offer more accurate suggestions and corrections.
Step-by-Step Process of Deleting Your Google Keyboard History:
-> Open Settings
- Unlock your Android device and navigate to the home screen.
- Find the “Settings” app, which usually looks like a gear or a set of sliders. Tap on it to open the Settings menu.
-> Access Language & Input Settings
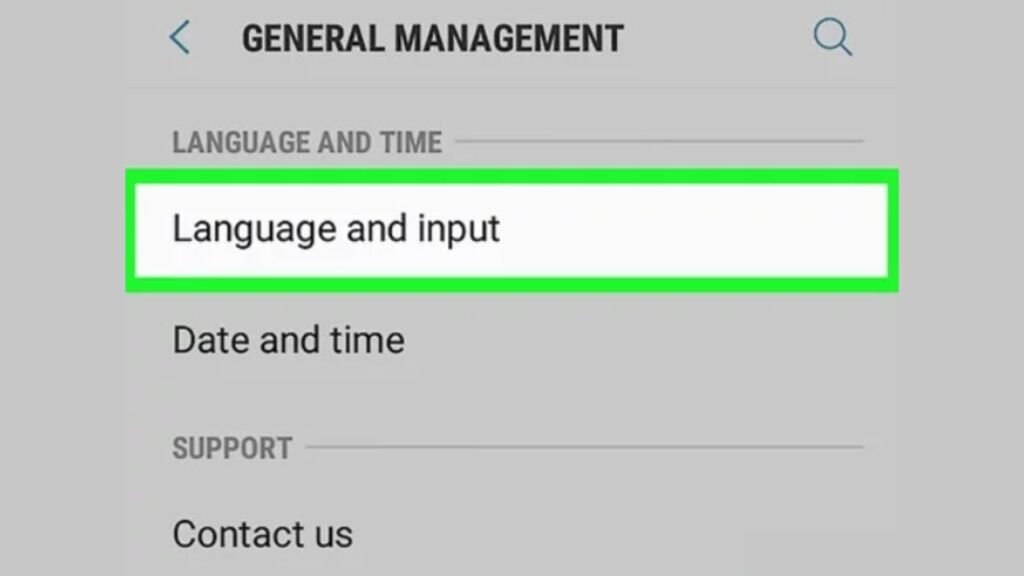
- In the Settings menu, scroll down until you find the “System” or “System & Device” option. Tap on it to expand the submenu.
- Now, locate and tap on “Languages & Input” or a similar option. This is where you’ll find settings related to your keyboard.
-> Select Virtual Keyboard
- Under the “Languages & Input” section, you’ll see a list of keyboards installed on your device. Look for “Virtual Keyboard” or “On-screen Keyboard” and tap on it.
- Depending on your device, this step may vary slightly. Some devices might require you to directly select the “Gboard” or “Google Keyboard” option.
-> Gboard Settings
- Inside the Virtual Keyboard settings, find and select “Gboard” or “Google Keyboard.” This will take you to the settings specific to the Google Keyboard app.
-> Text Correction Settings
- In the Gboard settings, scroll down until you see the “Text correction” section. Tap on it to access the text correction settings.
-> Clear Text Correction Data
- Within the “Text correction” settings, you’ll find an option called “Clear typing data.” Tap on this option.
- A confirmation message will warn you that this action will delete your Google Keyboard history. Confirm that you want to proceed.
-> Deletion Confirm
- After confirming, Google Keyboard will delete all your typing history, including learned words and phrases.
- You may also be prompted to confirm that this action cannot be undone. If you’re sure, proceed with the deletion.
-> Completion
- Once the process is complete, you’ll receive a confirmation message, and your Google Keyboard history will be wiped clean.
Conclusion:
It’s easy to safeguard your privacy, increase typing efficiency, and save storage space by clearing your Google Keyboard history.
It’s a good practice to delete your keyboard history periodically, especially if you’re using a shared device or want to keep your typing data private.
By carefully following the instructions in this article, you may quickly remove your Google Keyboard history and enjoy a brand-new virtual keyboard experience. Comment here.
Also read – >>> How to Connect a Bluetooth Keyboard to a Mac