When it comes to keeping your computer cool, proper airflow is essential.
One way to achieve this is by using a fan hub to connect multiple fans to your motherboard.
This article will guide you through connecting a fan hub to your motherboard, ensuring your system stays cool and efficient.
Enjoy the benefits of improved cooling and a cleaner, more organized computer setup.
What is a Fan Hub?
Before we dive into connecting a fan hub to your motherboard, let’s first understand what a fan hub is.
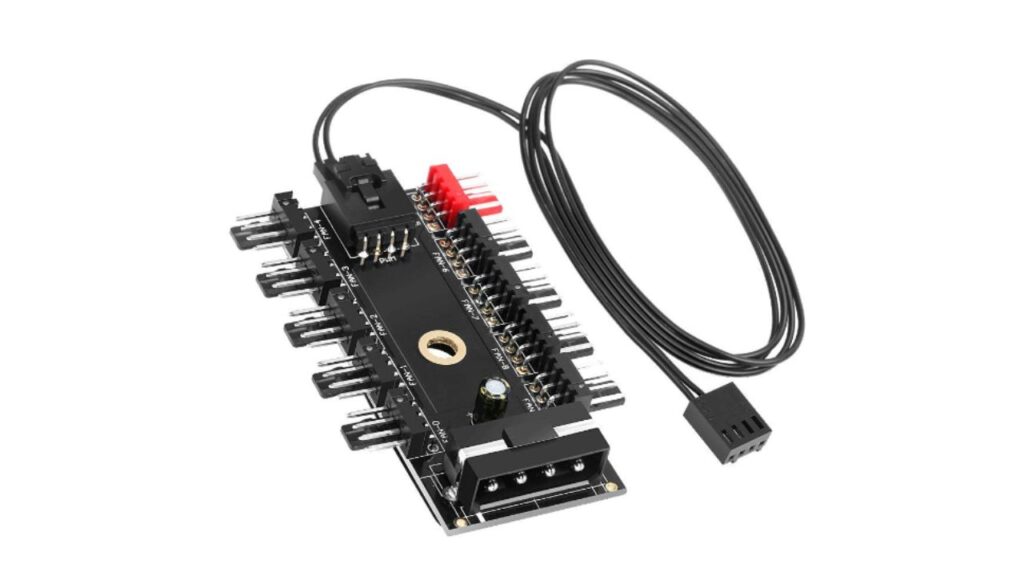
A fan hub is a device that consolidates the power and control of multiple fans into a single hub.
It lets you connect multiple fans to one power source and control them simultaneously.
This simplifies cable management and provides an efficient and organized way of controlling your computer’s cooling system.
Types of Fan Headers
There are 3 types of Fan Headers that you can find on the motherboard:
1. CPU Fan Header: For connecting the CPU Fan, too.
2. System Fan Header: For connecting PC/Case Fans (necessary for this article).
3. Power Fan Header: Used for monitoring the Fan of the Power Supply Unit. Your PSU needs to have the monitoring cable for this header to work.
The System Fan Header is ideal for case fans, splitters, and PC fan hubs.
How to Connect a Fan Hub to Your Motherboard
Step 1: Understanding Fan Hubs
Before diving into the installation process, it’s essential to grasp the fundamentals of fan hubs. This section explains fan hubs, their benefits, and why you might want to use one in your PC build.
Step 2: Check Compatibility
Before you connect a fan hub to your motherboard, it is crucial to check the compatibility of the fan hub with your motherboard.
Please consult the documentation or manufacturer’s website of both the fan hub and the motherboard to ensure they are compatible regarding connectors and power requirements.
Compatibility ensures a seamless and functional connection between the two components.
Step 3: Gather the Necessary Equipment
To successfully connect a fan hub to your motherboard, you will need the following equipment:
- Fan hub
- Appropriate connectors and cables
- Screwdriver (if required for installation)
- Ensure you have all the equipment and tools readily available before you begin the installation process.
Step 4: Identify the Fan Headers on Your Motherboard
Before connecting the fan hub, it is essential to identify the fan headers on your motherboard.
These headers, usually labeled as “CHA_FAN” or “SYS_FAN,” are where you will connect the fan hub cables.
The number of fan headers may vary depending on your motherboard model, so refer to the motherboard documentation to locate the specific headers you will be using.
Step 5: Connect the Fan Hub to the Motherboard
Now that you have identified the fan headers, it’s time to connect the fan hub to your motherboard. Follow these steps:
- Take the cable from the fan hub corresponding to the number of fans you connect. For example, when connecting three fans, take the cable labeled “FAN1-3.”
- Align the connectors on the cable with the fan header on the motherboard.
- Gently push the connectors together until they securely click into place. Ensure the connectors are oriented correctly to prevent forced connections that might damage the components.
- Repeat this process for each fan you are connecting, using separate cables for each fan.
- Once all the cables are connected, ensure they are neatly routed and secured, minimizing cable clutter for better airflow and aesthetics.
Step 6: Powering the Fan Hub
The fan hub requires power to operate. To provide power, locate a suitable power source on your motherboard. This is typically a header labeled “PWR_FAN” or “CPU_FAN.” Follow these steps:
- Take the cable from the fan hub labeled “PWR” or “POWER.”
- Align the connectors on the cable with the power header on the motherboard.
- Securely connect the cables, ensuring a snug fit.
- Depending on its power requirements, you may also need to connect an additional power cable from your power supply unit (PSU) to the fan hub. Refer to the fan hub’s documentation for specific instructions.
Step 7: Fan Hub Control
Connecting the fan hub to your motherboard consolidates the fans’ power and allows for control and customization.
Many fan hubs support software control through your motherboard’s BIOS or dedicated software.
This enables you to adjust fan speeds, monitor temperatures, and fine-tune your system’s cooling performance.
Consult your motherboard’s documentation for instructions on accessing and using the fan control features.
Step 8. Cable Management Tips
Clean and organized cable management not only improves aesthetics but also enhances airflow. We’ll offer some cable management tips to keep your PC looking neat and functioning at its best.
Step 9. Choosing the Right Fan Hub
Not all fan hubs are created equal. We’ll discuss the different fan hubs available and help you select the one that best suits your needs.
Step 10. Troubleshooting Common Issues
No installation is without its challenges. We’ll address some common problems you might encounter during the fan hub installation and provide solutions to resolve them.
Conclusion:
Connecting a fan hub to your motherboard allows you to effectively manage and control multiple fans, improving your computer’s airflow and cooling performance.
The process involves checking compatibility, gathering the necessary equipment, identifying fan headers, connecting the fan hub, powering it, and utilizing fan control options.
With these steps, you can optimize your system’s cooling capabilities, ensure the longevity of components, and maintain a cool and efficient computing experience. Comment here.