Before Getting Started:
Installing a computer processor might seem like a daunting task, but with the right guidance, it can be a straightforward process.
For the successful installation of a new processor in your desktop computer, carefully go through each segment and adhere to the outlined steps provided on this page.
Before diving into the installation, make sure you have the following:
- Antistatic precautions: Use an antistatic wrist strap to prevent electrostatic discharge.
- Make sure you have a good understanding of ESD (electrostatic discharge) and the potential risks associated with it.
- Record crucial details from the processor, including the Model Number, Serial Number, and specifications.
- Prior to physically installing the processor, ensure that the computer is powered off and disconnect the power source.
Remove Previous Processor:
If you’re upgrading your processor, start by removing the existing one. Gently release the processor from its socket or slot, taking care not to damage any surrounding components. Refer to your motherboard’s manual for specific instructions.
Install Processor:
After removing the existing processor from the computer, proceed to follow the steps outlined below for the installation of your new processor.
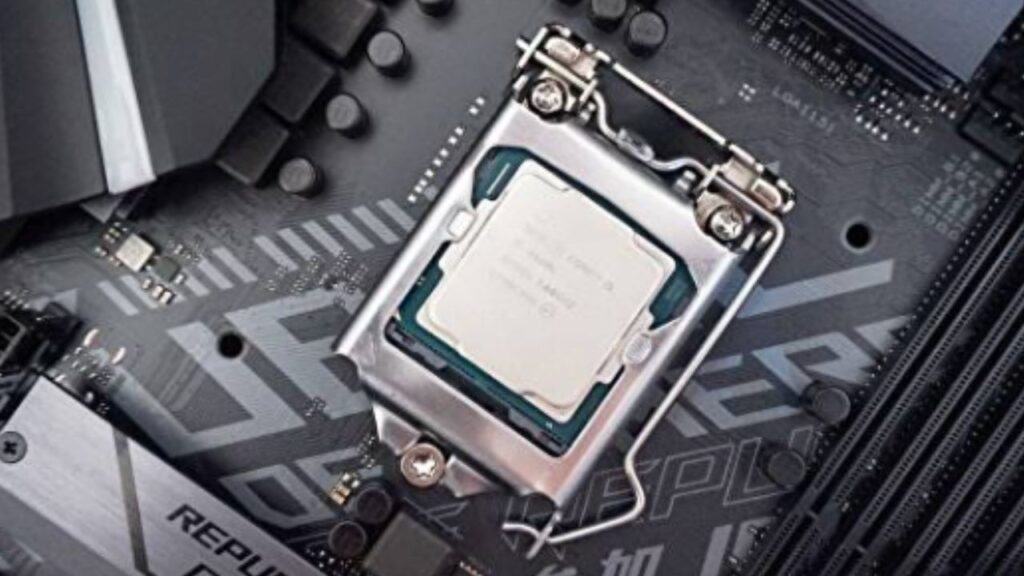
Socket Processor:
- Identify the CPU socket on your motherboard.
- Lift the lever to open the socket.
- Align the notches on the processor with those on the socket.
- Gently place the processor into the socket.
- Close the lever, securing the processor in place.
For the installation of a ZIF socket processor, initiate the process by raising the metal arm on one side of the socket to a vertical position.
Subsequently, inspect the top of the processor, where a small dot in one of the corners designates pin one on the bottom.
Examine the motherboard socket, which should either have a missing hole or be marked “1,” indicating pin one. Align the processor with both pin1 and hole1, then carefully place it into the socket.
Once correctly positioned, lowering the metal arm to the horizontal position should securely connect the processor.
In the case of a LIF socket processor installation, start by examining the top of the processor to identify pin one, marked with a small white dot.
After locating pin one on the processor, inspect the motherboard socket to find the corresponding pin one, identified by either a missing hole or a small “1” next to one of the corners.
Ensure proper alignment of the pins, and gently press the processor into the socket until it securely attaches.
Slot Processor:
- Align the notches on the processor with the corresponding guides on the slot.
- Gently slide the processor into the slot.
- If there’s a retention lever, secure it to hold the processor in place.
Concluding the installation process, if you are adding a slot processor, start by adjusting the tabs on both sides of the support brackets to the outward position.
Subsequently, insert the processor into the slot by applying gentle pressure. After the processor is properly placed within the brackets, the two tabs should securely snap into position.
Apply Heat Compound:
Apply a small amount of thermal paste or position a thermal pad onto the center of the processor. This ensures proper heat transfer between the processor and the heat sink.
Thermal grease is a unique compound that can be administered to the CPU’s surface before affixing the heat sink.
Its primary function is to facilitate the transfer of heat from the CPU to the sink, effectively reducing the temperature of your central processing unit.
Attach Heat Sink
- Position the heat sink over the processor, aligning it with the mounting holes.
- Secure the heat sink using the provided screws or clips.
- Ensure the heat sink is firmly in place, but avoid overtightening, which may damage the processor or motherboard.
Troubleshooting
- No Boot: Double-check your processor’s compatibility with your motherboard. Ensure all connections are secure.
- Overheating: If your system is running too hot, verify the thermal paste application and the heat sink’s proper attachment.
Buying Tips and Help
- Compatibility: Always check if your chosen processor is compatible with your motherboard.
- Cooling Solutions: Consider aftermarket coolers for better thermal performance.
- Professional Assistance: If you need more clarification on the installation process, seek help from a professional.