Microphones are essential for tasks such as voice chatting, recording audio, and using speech recognition. But, how to set up and test microphones in Windows?
If you’re having trouble with your microphone in Windows, here are some steps you can take to set it up and test it.
Microphone Testing Windows 10
Set up your microphone:
- Ensure the microphone is connected to your PC.
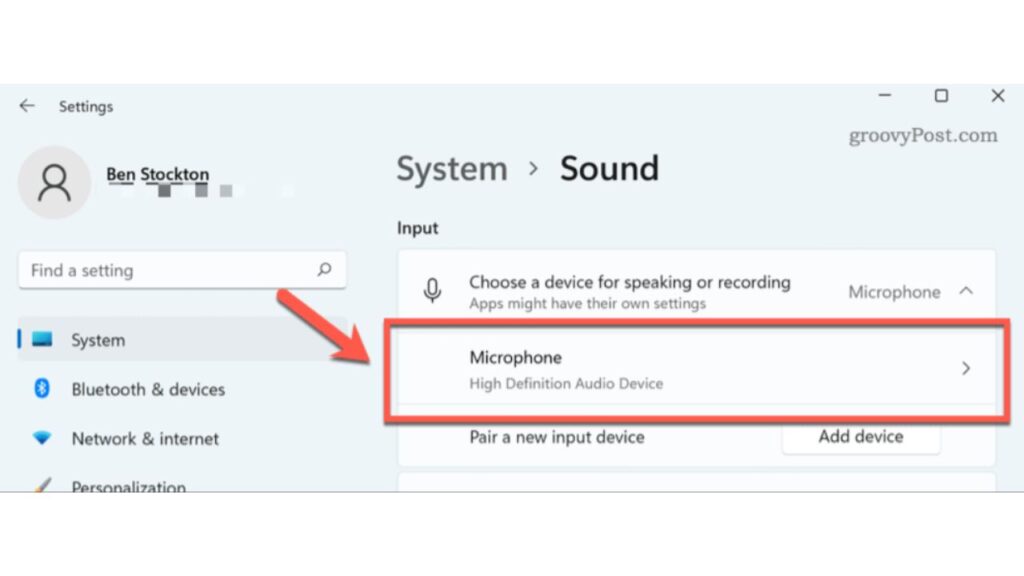
- Select Start > Settings > System> Sound.
- Sound settings: go to Input, and in the Choose your input device list, select the microphone or recording device you want to use.
Testing Your Microphone Windows 10
- Ensure the microphone is connected to your PC.
- Select Start> Settings> System> Sound.
- For sound settings, go to Input and under Test microphone, look for the blue bar that rises and falls as you speak into a microphone. If the bar is moving, your microphone is working properly.
- If you are not seeing the bar move, select Troubleshoot to fix your microphone.
Testing Your Microphone on Windows 11
Set up your microphone:
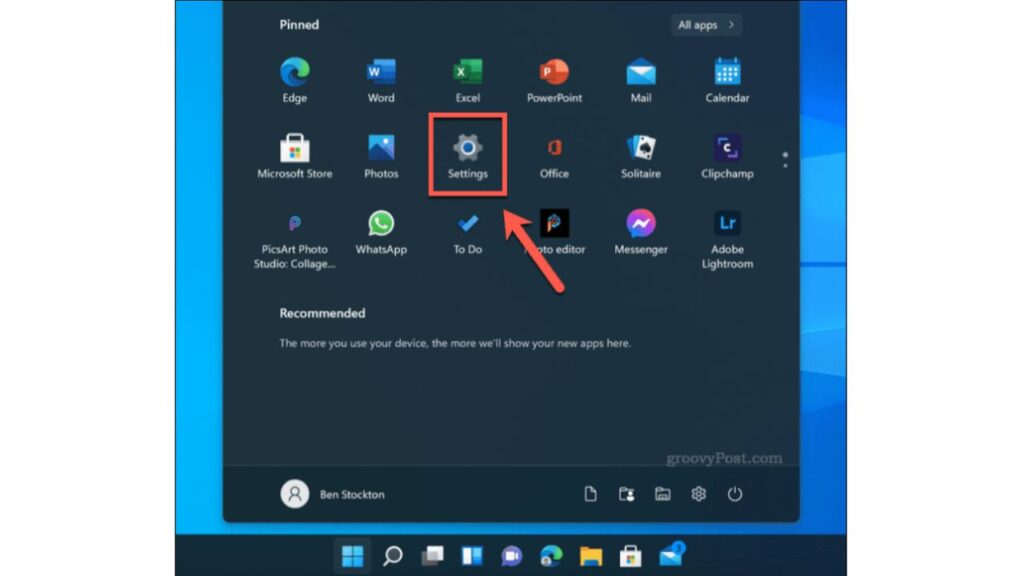
- Open the Start Menu
- Select Settings
- Right-click the speaker icon in the taskbar and select Sounds.
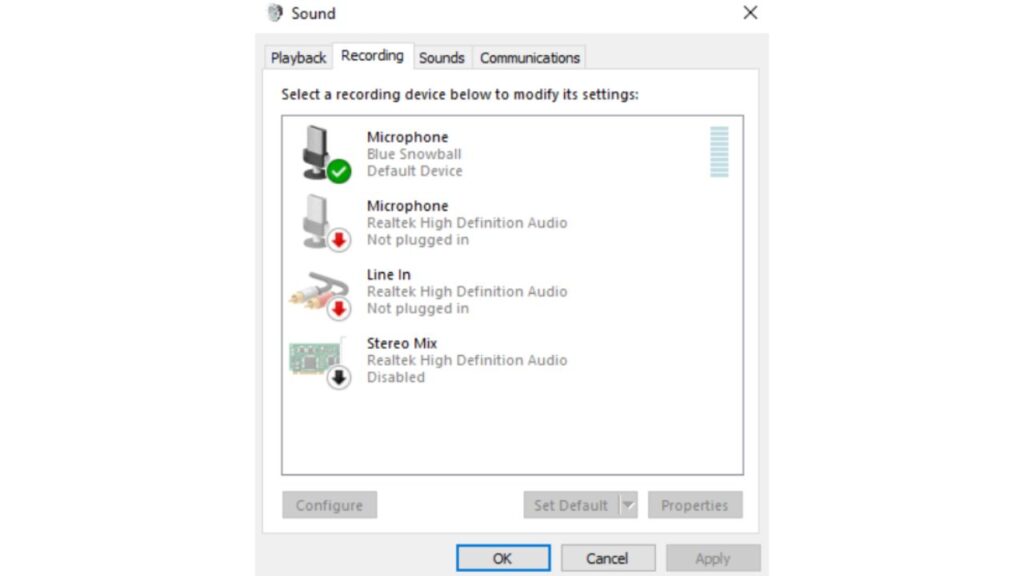
- Click the Recording tab.
- Select your microphone and then click the Set Default Device button.
- Click the Properties button.
- Click the Levels tab.
- Adjust the microphone volume slider to the desired level.
- Click OK to save your changes.
Testing Your Microphone Windows 11
- Right-click the speaker icon in the taskbar and select Sounds.
- Click the Recording tab.
- Select your microphone and then click the Test button.
- Speak into your microphone. You should see the green bars in the Test window move up and down as you speak.
- If you can’t hear your voice or the green bars aren’t moving, try adjusting the microphone volume slider in the Properties window.
Troubleshoot Microphone Problems
If you’re still having trouble with your microphone, there are a few things you can try:
- Make sure that your microphone is enabled. Right-click the speaker icon in the taskbar and select Sounds. Click the Recording tab and make sure that your microphone is not disabled.
- Try restarting your computer.
- Update your audio drivers. You can download the latest audio drivers from the manufacturer’s website.
- Try using a different microphone. If you have another microphone, try using it to see if it works. If it does, then the problem is with your original microphone.
You can contact Microsoft support for help if you still need help.
Additional Tips for Microphone Testing:
- Consider using the “Troubleshoot” option in the Sound settings if you encounter problems.
- Ensure your microphone is not muted (both physically and in software).
- Test your microphone in different applications, such as voice recording software, to ensure it works.
- Update your microphone drivers if necessary. You can do this through the Device Manager.
Conclusion:
Setting up and testing microphones in Windows is a crucial step to ensure clear and high-quality audio in various applications.
By following these steps, you can configure your microphone correctly and troubleshoot any issues that may arise.
Whether participating in virtual meetings, creating content, or enjoying online gaming, a well-functioning microphone is key to effective communication and an enhanced user experience. Comment here.
FAQ:
How do I test my microphone on my laptop?
To test your microphone on your laptop in Windows, follow these steps:
- Access the Sound settings by right-clicking the speaker icon in the system tray and selecting “Open Sound settings.”
- Under the “Input” section, choose your microphone from the list of available input devices.
- Speak into your microphone. You should see the green bar next to your microphone move up and down, indicating that the microphone is picking up sound. This confirms that your microphone is working.
How can I hear my real voice?
You can enable microphone monitoring to hear your real voice in real-time while using a microphone.
Here’s how:
- Right-click on the speaker icon in the system tray and select “Open Sound settings.”
- Under the “Input” section, click on “Device properties.”
- In the microphone properties window, go to the “Listen” tab.
- Check the box that says, “Listen to this device.”
- Click “Apply” and then “OK.”
This will allow you to hear your voice through your computer’s speakers or headphones as you speak into the microphone.
How do I enable microphone monitoring?
Microphone monitoring can be enabled by following the steps mentioned in the previous answer.
It involves going into the microphone properties and checking the “Listen to this device” option in the “Listen” tab.
How do you use a microphone test?
Using a microphone test involves following these steps:
- Access the Sound settings in Windows by right-clicking on the speaker icon in the system tray and selecting “Open Sound settings.”
- Under the “Input” section, select your microphone.
- Speak into your microphone. The green bar next to your microphone should move up and down, indicating the microphone is picking up sound. This confirms that your microphone is working.
You can also use third-party microphone testing websites or software to perform more comprehensive microphone tests, often including audio quality checks.
Why is my mic quality so bad?
Poor microphone quality can result from various factors, including:
- Hardware issues: Check your microphone for physical damage or loose connections.
- Driver problems: Ensure your microphone drivers are up to date.
- Background noise: Minimize background noise in your recording environment.
- Settings: Adjust your microphone settings in Windows to optimize audio quality.
- Low-quality microphone: Consider upgrading to a higher-quality microphone if yours is of poor quality.
How do I check audio quality?
To check the audio quality, you can:
- Record a sample audio using your microphone.
- Listen to the recorded audio to assess its clarity and quality.
- Use audio editing software to analyze and enhance the audio if needed.
- Ensure that your microphone’s settings (sample rate, bit depth, and volume) are properly configured in your computer’s Sound settings.
Also Read – >>> The Best Laptop Brands List in the World