Your computer’s keyboard driver plays a crucial role in ensuring that your keystrokes are accurately registered and translated into on-screen actions.
However, there may be instances when you need to uninstall a keyboard driver. Whether you’re troubleshooting a hardware issue or upgrading your system, removing a keyboard driver is a straightforward process.
In this guide, we’ll walk you through the steps to uninstall a keyboard driver on Windows and macOS.
Why Uninstall a Keyboard Driver?
Before we dive into the uninstallation process, it’s essential to understand why you might want to remove a keyboard driver.
Here are a few common reasons:
- Troubleshooting: If your keyboard is malfunctioning or not working correctly, uninstalling and reinstalling the keyboard driver can help resolve the issue.
- Upgrading or Replacing Hardware: When you upgrade or replace your keyboard with a new one, it may require a different driver. Uninstalling the old driver is necessary to ensure the new keyboard functions properly.
- Driver Conflicts: Occasionally, driver conflicts can occur, causing issues with keyboard functionality. Removing and reinstalling the driver can resolve these conflicts.
Now, let’s look at the steps to uninstall a keyboard driver on both Windows and macOS.
How to Uninstall a Keyboard Driver on Windows:
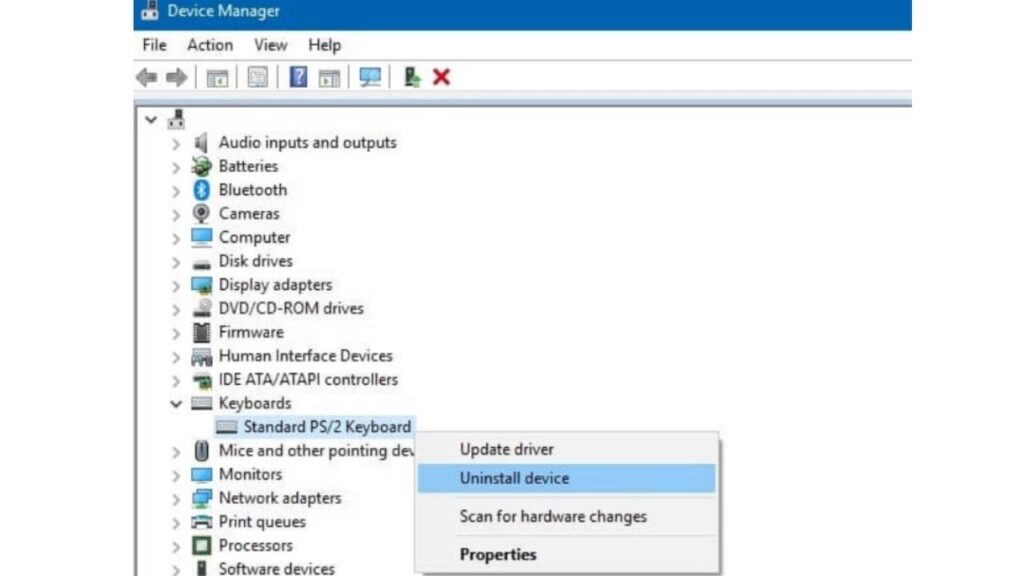
Access Device Manager: Press Win + X and select “Device Manager” from the menu. Alternatively, search for “Device Manager” in the Windows search bar, and click on the corresponding result.
Locate the Keyboard: In the Device Manager, expand the “Keyboards” category to reveal the list of keyboards installed on your system.
Uninstall the Driver: Right-click on the keyboard driver you want to uninstall and select “Uninstall device” from the context menu.
Confirm Uninstallation: A confirmation prompt will appear. Check the box that says “Delete the driver software for your device” to completely remove the driver. Click “Uninstall.”
Restart Your Computer: After the driver is uninstalled, it’s a good practice to restart your computer to allow Windows to automatically install the default keyboard driver.
How to Uninstall a Keyboard Driver on macOS:
Open System Preferences: Click on the Apple menu in the top left corner of your screen and select “System Preferences.”
Access Keyboard Settings: In the System Preferences window, click on “Keyboard.”
Remove the Keyboard: Under the “Keyboard” tab, select the keyboard you want to uninstall from the list of recognized keyboards.
Delete the Keyboard: Click the “–” (minus) button below the list of keyboards to remove the selected keyboard.
Confirm Deletion: A confirmation dialog will appear. Click “Remove” to uninstall the keyboard.
Restart Your Mac: After removing the keyboard, it’s advisable to restart your Mac to ensure any changes take effect.
Summary
Uninstalling a keyboard driver is a relatively simple process on both Windows and macOS.
Whether you’re troubleshooting issues, upgrading your hardware, or dealing with driver conflicts, the steps outlined in this guide should help you successfully remove and, if necessary, reinstall your keyboard driver.
Remember to back up any essential data before making any significant changes to your system, and always follow best practices for maintaining your computer’s health and performance.
What happens when you uninstall a keyboard driver on Windows?
When you uninstall a keyboard driver on Windows, the operating system will revert to using a generic keyboard driver or the default driver that came with your computer.
It can help resolve issues related to the keyboard driver itself or driver conflicts that may be causing problems.
Uninstalling the keyboard driver will remove the specific software that allows the keyboard to function optimally, so it’s essential to reinstall the appropriate driver afterward.
How do I fix a keyboard that is not working?
If your keyboard is not working, you can try the following steps to troubleshoot and potentially fix the issue:
-
- Check the keyboard connection to ensure it’s properly plugged in or connected.
- Restart your computer, as sometimes this can resolve temporary glitches.
- Test the keyboard on another computer to determine if it’s a hardware or software issue.
- Uninstall and reinstall the keyboard driver (as explained in the following steps for Windows 10).
- Ensure there’s no physical damage to the keyboard itself.
- If you’re using a wireless keyboard, check the battery or connectivity.
How do I find the keyboard drivers on my computer?
To find the keyboard drivers on your computer, follow these steps:
-
- On Windows: Access the Device Manager (LOOK for it in the Start menu or right click on the Start button) and expand the “Keyboards” category. Here, you’ll see a list of installed keyboard drivers.
- On Mac: Keyboard drivers are typically managed by macOS, and you don’t need to locate or manage them manually. Any driver-related tasks can be done through System Preferences.
Follow these steps to uninstall and reinstall keyboard drivers on Windows 10
-
- Open the Device Manager (Look for it in the Start menu or right click on the Start button).
- Expand the “Keyboards” category to see the list of installed keyboard drivers.
- Right-click on the keyboard driver you want to uninstall and select “Uninstall device.”
- Confirm the uninstallation and choose to delete the driver software for the device if the option is available.
- Restart your computer/PC, and Windows will automatically reinstall the default keyboard driver.
Why isn’t my keyboard typing on my laptop?
If your laptop keyboard is not typing, it can be due to several reasons. Here are some common troubleshooting steps:
-
- Check for physical obstructions like debris or dirt under the keys.
- Restart your laptop to clear any temporary issues.
- Test an external keyboard to ensure it’s not a hardware issue.
- Update or reinstall the keyboard driver if it’s a software-related problem.
- Scan for viruses or malware that may be affecting the keyboard’s functionality.
- If all else fails, then consider seeking professional assistance for hardware repairs.
How do I update my keyboard?
To switch your keyboard on an Android device, follow these steps:
- Open your device’s Settings.
- Navigate to System settings.
- Choose the “Keyboard and input method” option.
- Select “Current keyboard.”
- Pick your desired keyboard. Please note that the specific steps may vary slightly based on your phone model.
- Additionally, you can expand your keyboard options by downloading third-party keyboards from the Google Play Store.