Upgrading the onboard memory of a laptop can help improve its performance. If your laptop is running slow or struggling to run certain programs, upgrading the RAM can be cost-effective. However, ensuring your laptop is compatible with the RAM chip you plan to install is important.
The first step is to check the RAM chip supported by your laptop. You can do this by visiting the official website of your laptop’s manufacturer and downloading the BIOS file. Once you’ve downloaded the file, use a decompression tool like Winzip to extract the contents. From there, you can check the RAM chip supported by your laptop and purchase a compatible chip.
You can begin the installation process once you have the compatible RAM chip. It’s important to ensure you have the necessary tools and follow the manufacturer’s instructions carefully. With the right tools and patience, upgrading your laptop’s onboard memory can be a relatively simple process that can greatly improve its performance.
What is Onboard Memory?
Onboard memory is what it sounds like: it gives the mouse the ability to store your preferred settings, such as CPI settings, key bindings, and RGB preferences, onboard or in the mouse.
How to Upgrade Laptop Onboard RAM?
When upgrading laptop memory, it’s important to understand the difference between onboard memory and traditional RAM. Onboard or soldered memory is permanently attached to your laptop’s motherboard. It means that it cannot be removed or upgraded like traditional RAM.
Onboard memory is becoming increasingly common in laptops, particularly thin, lightweight models. This is because soldered memory takes up less space and allows manufacturers to create slimmer devices. However, the downside is that it can limit your ability to upgrade the memory in the future.
Having 8GB onboard + 8GB DIMM RAM means your laptop has 16GB of memory. Integrated RAM refers to memory built directly into the laptop’s motherboard, while DIMM RAM refers to additional memory that can be added to the laptop through a DIMM slot.
Overall, understanding the type of memory your laptop uses is crucial for upgrading. If your laptop has onboard memory, consider other ways to improve performance, such as upgrading the storage drive or optimizing software.
Checking Your Laptop’s Current Memory
Before upgrading your laptop’s onboard memory, you need to know how much memory your laptop currently has. There are a few ways to check your laptop’s current memory:
1. Task Manager
Using the Task Manager is one way to check your laptop’s current memory.
To open the Task Manager, right-click on the taskbar, select “Task Manager” or press “Ctrl + Shift + Esc” on your keyboard.
Once the Task Manager is open, click on the “Performance” tab and then click on “Memory” on the left-hand side.
Here, you can see how much memory is currently being used and how much memory is available.
2. System Information
Another way to check your laptop’s current memory is to use the System Information tool.
To open the System Information tool, type “System Information” in the search bar on the taskbar and select “System Information” from the search results.
Once the System Information tool is open, look for the “Installed Physical Memory (RAM)” under the “System Summary” section.
Here, you can see how much memory is installed on your laptop.
3. Manufacturer’s Website
If you are still seeking the information you need using the above methods, check your laptop’s manufacturer’s website. Look for your laptop’s model number and specifications.
Here, you can see how much memory your laptop came with and whether it can be upgraded.
It is important to note that not all laptops have upgradeable memory. Some laptops have soldered memory, which means the memory is permanently attached to the motherboard and cannot be upgraded.
Therefore, it is important to check if your laptop’s memory can be upgraded before attempting to upgrade it.
Selecting the Right Memory Upgrade
Selecting the right memory upgrade is crucial when upgrading your laptop’s onboard memory. Not all memory upgrades are created equal, and choosing the wrong one can lead to compatibility issues and poor performance.
First and foremost, you need to determine what type of memory your laptop uses. This information can typically be found in your laptop’s user manual or through a quick online search using your laptop’s make and model. The most common types of memory used in laptops are DDR3, DDR4, and LPDDR3.
Once you know what type of memory your laptop uses, you must determine the maximum amount of memory your laptop can support.
This information can also be found in your laptop’s user manual or via a quick online search. Remember that just because your laptop can support a certain amount of memory doesn’t mean you need to upgrade to the maximum amount.
Upgrading to a smaller amount of memory may improve performance.
After determining what type and how much memory your laptop can support, you must choose a reputable brand and model of memory upgrade.
Some of the most popular and reliable brands include Kingston, Crucial, and Corsair. Choosing a memory upgrade with the same speed and voltage as your laptop’s current memory is also important to ensure compatibility.
When shopping for a memory upgrade, it’s a good idea to read reviews and check the manufacturer’s website for compatibility information. Some manufacturers even offer compatibility tools that allow you to enter your laptop’s make and model to ensure you choose the right memory upgrade.
Selecting the right memory upgrade for your laptop requires research and attention to detail. But with the right information and a little effort, you can upgrade your laptop’s onboard memory and enjoy improved performance and productivity.
Purchasing the Memory Upgrade
When purchasing a memory upgrade for your laptop, you have two main options: online retailers and physical stores. Here are some things to consider when deciding which option is best for you.
Online Retailers
Online retailers offer a wide variety of memory upgrades at competitive prices.
They also often provide detailed product descriptions and customer reviews, which can help you make an informed decision.
Some popular online retailers for memory upgrades include:
- Amazon
- Newegg
- Crucial
- Best Buy
When purchasing from an online retailer, check the compatibility of the memory upgrade with your laptop.
You can usually find this information on the product page or using the manufacturer’s compatibility tool.
Physical Stores
Physical stores such as Best Buy and Micro Center also offer laptop memory upgrades. One advantage of purchasing from a physical store is that a technician can install the memory upgrade on the spot.
It can save you time and hassle compared to installing the memory yourself.
Check the return policy and warranty information when purchasing from a physical store. You should also call ahead to ensure the store has the memory upgrade in stock before making the trip.
In summary, online retailers and physical stores offer laptop memory upgrades.
Consider your needs and preferences when deciding which option is best for you.
Preparing for Installation
Before upgrading the onboard memory of your laptop, it is important to prepare properly to avoid any data loss or damage to your device.
This section will explain the necessary steps before proceeding with the installation.
Backing up Data
Before starting the installation process, it is essential to back up all your important data. It will ensure you have a copy of your files in case of any unexpected data loss.
You can back up your data using an external hard drive, cloud storage, or a reliable backup method. Double-check that all your important files are backed up before installing.
Gathering Necessary Tools
To upgrade the onboard memory of your laptop, you will need a few tools.
Here is a list of the tools you will need:
- Screwdriver: You will need a screwdriver to remove the back cover of your laptop.
- Anti-static wrist strap: This strap will prevent static electricity from damaging your laptop’s components.
- New RAM module: You will need to purchase a new RAM module that is compatible with your laptop’s specifications. You can check your laptop’s manual or use a system information tool to determine how much RAM your laptop can support.
Ensure to gather all the necessary tools before starting the installation process. It will ensure you have everything you need and can complete the installation without interruptions.
By following these steps, you can prepare yourself for upgrading the onboard memory of your laptop. Remember to back up your data and gather all the necessary tools before installing.
Installing the New Memory
Upgrading the onboard memory of your laptop can be a quick and easy process.
In this section, I will guide you through installing the new memory.
Open Your Laptop
Before you start, ensure your laptop is turned off and unplugged from the power source.
Then, locate the memory compartment on the bottom of your laptop. It is usually marked with a small icon resembling a memory module.
Use a screwdriver to remove the screws that hold the memory compartment cover in place. Once you have removed the cover, you should be able to see the memory slots.
Removing the Old Memory
The next step is to remove the old memory modules. First, locate the clips that hold the memory in place. Push these clips outward until the memory module pops up at an angle.
Next, carefully grasp the memory module by its edges and pull it out of the slot. Repeat this process for all the memory modules you want to replace.
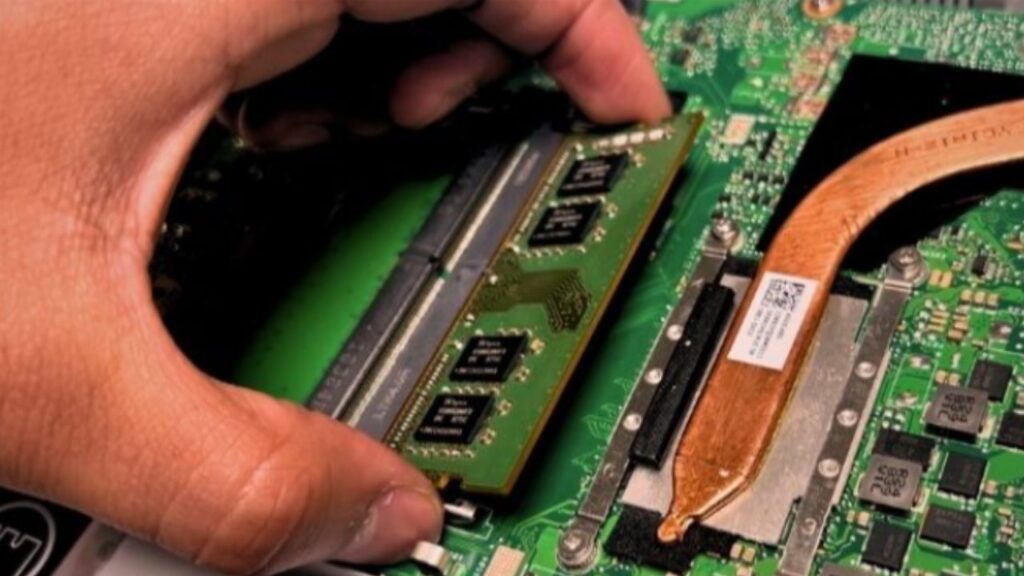
Inserting the New Memory
Now, it’s time to insert the new memory modules. First, make sure that the new modules are compatible with your laptop. You can check your laptop’s manual or use a memory configurator tool to determine the correct type and speed of memory.
Align the notches on the memory module with the notches in the memory slot and gently push the module down until it clicks into place. Ensure the clips snap back into place and securely hold the memory.
Repeat this process for all the memory modules you want to install. Once you have installed all the new memory, replace the memory compartment cover and secure it with the screws.
That’s it! You have successfully installed new memory on your laptop. Turn on your laptop and check the system properties to ensure that the new memory is recognized.
If you encounter any issues, refer to your laptop’s manual or contact the manufacturer for assistance.
Post-Installation Steps
After successfully upgrading the onboard memory of your laptop, there are a couple of post-installation steps that you need to take to ensure that everything is working correctly.
In this section, I will guide you through two essential post-installation steps: reassembling the laptop and testing the new memory.
Reassembling the Laptop
Before reassembling your laptop, ensure you have all the screws, tools, and parts you removed during the upgrade process.
Follow these steps to reassemble your laptop:
- Please insert the new memory module into the slot and ensure it is securely in place.
- Reattach the bottom cover of the laptop and tighten the screws.
- Reinstall the battery and plug in the power adapter.
- Turn on the laptop and check if it recognizes the new memory.
Testing the New Memory
After reassembling your laptop, it’s time to test the new memory to ensure it works correctly.
Here are the steps to test the new memory:
- Restart the laptop and enter the BIOS setup by pressing the key indicated during startup (usually F2 or Del).
- Navigate to the memory settings and check if the new memory is detected.
- If the new memory is detected, exit the BIOS setup and boot into Windows.
- Open the Task Manager and go to the Performance tab.
- Check if the new memory is recognized under the Memory section.
- Run memory-intensive applications to test the new memory’s performance.
If the new memory is undetected or there are any issues with the laptop’s performance, double-check that the memory is installed correctly and try reseating it.
If the problem persists, contact the laptop manufacturer’s support team for further assistance.
In conclusion, upgrading the onboard memory of your laptop can significantly improve its performance.
After completing the upgrade, follow the post-installation steps outlined in this section to ensure everything works correctly.
Troubleshooting Common Issues
As with any technical upgrade, there can be issues that arise during the process of upgrading onboard memory.
Here are some common problems and solutions to help troubleshoot any issues that may arise:
Memory Not Recognized
If your computer does not recognize the new memory upgrade, it may be due to a few factors. First, ensure the memory is fully seated in the memory slot.
Sometimes, getting the memory to click into place may take extra pressure. If that doesn’t work, try removing the memory and reinserting it.
Another issue may be compatibility. Ensure the memory you purchased is compatible with your laptop’s motherboard.
You can check the specifications for your laptop’s motherboard to ensure the memory you purchased is compatible.
Blue Screen of Death
If you encounter the dreaded Blue Screen of Death (BSOD) after upgrading your memory, it may be due to a few different reasons. One possible cause is that the memory is incompatible with your laptop’s motherboard.
Another possible cause is that the memory is faulty.
Try removing the new memory to troubleshoot this issue and see if the BSOD disappears.
If it does, then the new memory may be the culprit. If the BSOD persists, then it may be a different issue altogether.
Slow Performance
If your laptop is running slower than usual after upgrading the memory, it may be due to a few factors. One possible cause is that the memory is not installed correctly.
Ensure the memory is fully seated in the memory slot and compatible with your laptop’s motherboard.
Another possible cause is that other issues with your laptop are causing the slow performance. Try running a virus scan or cleaning up your hard drive to see if that helps improve performance.
In summary, upgrading onboard memory can be a great way to improve your laptop’s performance, but it’s important to troubleshoot any issues that may arise.
Following these tips can ensure a successful upgrade and get the most out of your laptop.
FAQ:
How can I determine if my laptop’s onboard memory can be upgraded?
You can check whether your laptop’s onboard memory can be upgraded by referring to the manufacturer’s website or user manual. Another way is to look at the Task Manager on your laptop and check the “Memory” tab. You can upgrade your onboard memory if the “Total” memory is less than your laptop’s maximum capacity.
What is the maximum amount of RAM my laptop can support?
The maximum amount of RAM your laptop can support depends on the model and manufacturer. This information can be found in the user manual or the manufacturer’s website. To upgrade your laptop’s onboard memory, ensure you do not exceed the maximum capacity of your laptop.
What type of RAM should I buy for my laptop upgrade?
To determine the type of RAM you should buy for your laptop upgrade, check the user manual or the manufacturer’s website. You can also use online tools that can scan your laptop and provide you with the right type of RAM. Ensure you buy your laptop’s correct type of RAM to avoid compatibility issues.
Can the onboard RAM be upgraded in a laptop?
Yes, it is possible to upgrade onboard RAM in a laptop. However, it depends on the model and manufacturer. Some laptops have onboard memory soldered to the motherboard and cannot be upgraded. In such cases, you must replace the entire motherboard to upgrade the memory.
Can I add more RAM to my laptop without voiding the warranty?
Adding more RAM to your laptop does not void the warranty. However, if you damage any other components while upgrading the RAM, it may void the warranty. To avoid this, it is recommended that you take your laptop to a professional technician or follow the manufacturer’s instructions carefully.
How difficult is it to install new RAM in a laptop?
Installing new RAM in a laptop is easy if you follow the manufacturer’s instructions carefully. However, it requires some technical knowledge and experience. If you need more confidence in your ability to install new RAM, it is recommended that you take your laptop to a professional technician.
Conclusion:
In this article, I have explained the process of upgrading the onboard memory of a laptop. I have provided step-by-step instructions on determining the type of RAM your laptop uses, how much memory you need, and how to install the new RAM module.
Upgrading your laptop’s onboard memory can significantly improve its performance, especially if you frequently use memory-intensive applications like video editing software or virtual machines.
With the right tools and some know-how, you can easily upgrade your laptop’s memory and enjoy a faster, more responsive computer.
Always check your laptop’s documentation or manufacturer’s website to ensure you purchase the correct type of RAM for your laptop.
Additionally, carefully handle the RAM modules and follow the installation instructions closely to avoid damaging your laptop or the new memory module.
Overall, upgrading your laptop’s onboard memory is a simple and effective way to boost its performance and extend its lifespan.
With a little time and effort, you can enjoy a faster, more efficient computer that meets all your computing needs.
Comment here.